
Wednesday, June 30, 2010
Have I told you lately...
Friday, June 25, 2010
Friday Adventure

What did I do? I managed to put a sewing machine needle almost all the way through my left index finger. I was working on some embroidery, set up the machine, and after I'd pressed "start," one of my wonderful children distracted me. It was just for an instant, but it was long enough for me to move my finger into the path of a very fast-moving needle. It broke off of the machine when I jerked my hand away.
I looked around my desk for a moment, searching for the broken needle, before I realized it was lodged in my fingernail. It went down through the middle, across at an angle, and almost out the other side. I could feel where it was, and the needle was maybe an eighth of an inch from going completely through my finger. Yeah. Yowch!
A 911 call, three police cars, several MP's with guns drawn, one very good friend to pick up the kids, and one ambulance later, I was on my way to the hospital. It actually wasn't a very big deal to get the "foreign object" out. They X-rayed my finger to be sure I hadn't pierced the bone first, and once it was determined that I had not, the doctor gave me a couple of shots in the finger to numb it and yanked that bad boy out. My finger is now wrapped in layers and layers of gauze until Monday, and bathing myself and the kids is going to be interesting for the next couple of days, but otherwise, it should be fine. I have antibiotics to keep it from getting infected, and I got an update on my tetanus shot out of the experience, too.
What have I learned? There are occupational hazards to sewing, and from now on, I will only work when the kids are napping or asleep for the night. No more distractions!
The Mostly Finished Living Room
We've been living in this house for nearly seven months now, and I'm finally getting the living room decorated. It's been a big challenge for me to figure out what to do with it. There's only one way the furniture fits in the room, and it left me with large expanses of stark white walls to deal with. Painting is not an option in this house, because the living room is connected to the dining room which is connected to the kitchen, etc, and I am not one of those people whose things match in every room. Lord, help me if we ever live in a home with an even more open floor plan.
A couple of months ago, I finally got a handle on the wall over the couch. You can see it here.
A little while after that, I invested in some curtain panels from Wal-Mart. That's right, Wal-Mart. I had to order them, because the store doesn't stock the longer length. Want to see the ones I got? Click here. As an added bonus, they're energy efficient.

Around the same time, I ordered some green ticking stripe fabric to make shades for the living room. We have some lovely metal mini-blinds that I'd rather not look at every day. They're just one more layer of white-ness. Also, the living room has four windows, and our loveseat is pushed up under two of them. I didn't feel like the long drapes would look right there, so I've put the shades on all four windows and the curtains on two. The fabric shades serve the purpose of tying everything together. I'm posting pictures even though they're not completely finished. I think I want to put dowels in the bottoms, roll them up a little, and secure them with some cream ribbon. I just haven't found the right ribbon yet.

The final challenge was the wall over the television. I'm not really crazy about having photos staring out at me from over the TV, but I also wasn't sure what else to do. A couple of days ago, we were driving home from the grocery store, and we passed a moving sale on base. I came away with the most awful banana yellow wall shelf they had. It was the only one that didn't have those little heart cutouts. I like most things country, but I don't dig the heart cutouts. The color was so horrible that I didn't even take a before picture. Sorry! Now, it is black, it hangs over the television, and it holds silhouettes of the kids that I made at Christmas. I did a bunch as gifts for grandparents and great-grandparents, and I made myself an extra pair while I was at it. I'm not sure why I didn't think 02. uu, put them over the TV sooner! I love them there! The shelf needs a couple more tchotchkes and maybe something else hanging above it, but it's definitely better than a blank wall.

A couple of months ago, I finally got a handle on the wall over the couch. You can see it here.
A little while after that, I invested in some curtain panels from Wal-Mart. That's right, Wal-Mart. I had to order them, because the store doesn't stock the longer length. Want to see the ones I got? Click here. As an added bonus, they're energy efficient.

Around the same time, I ordered some green ticking stripe fabric to make shades for the living room. We have some lovely metal mini-blinds that I'd rather not look at every day. They're just one more layer of white-ness. Also, the living room has four windows, and our loveseat is pushed up under two of them. I didn't feel like the long drapes would look right there, so I've put the shades on all four windows and the curtains on two. The fabric shades serve the purpose of tying everything together. I'm posting pictures even though they're not completely finished. I think I want to put dowels in the bottoms, roll them up a little, and secure them with some cream ribbon. I just haven't found the right ribbon yet.


Here's the finished product...well, most of it, the wall that needed the most help, anyway. And yes, we are doing the dinosaur dance with Dance A Lot Robot. What? ;)
Tuesday, June 22, 2010
Progress
It
has been five weeks since John and I began dieting, and it is still going
really well. I have lost ten pounds now, and I’m only five pounds shy of my
goal. I’ve also been measuring myself every couple of weeks, and while I won’t
share every intimate detail, I will say that I’ve lost an inch and a half in
the waist and two inches in my hips. Some of my clothes are starting to look
funny. And others, well, I’m actually a bit embarrassed that I was squeezing
into them and going out in public. I’m sorry if I was an eyesore!
How
do I feel? Wonderful! This is the most consistent I’ve been with a diet and
cardiovascular exercise in a long time. I’ve gone through phases where I’ve
dieted and phases where I’ve done a lot of weight training, but I have
definitely been lazy and left cardio out of the equation. It’s apparent to me
from the results I’m getting now that it is necessary. It would still be much
easier for me to run if I were being chased. Running isn’t something I enjoy
very much, but I’m making myself do it. I am also going to a gym now, and in
addition to doing weight training there, I’ve been using the arc trainer to
break up the cardio monotony.
If
everything goes according to plan, I should reach my weight loss goal in a few
more weeks. Then, I can start maintaining and continue to work on toning what’s
left. I’m no longer scared that I won’t make it. I’m ready!
Monday, June 21, 2010
Patriotic Sundress

I made Neely bug a fun dress to wear for Independence Day. It was a wrestling match to get her into it, as it is with everything I make her for some reason, but once the dress was on, it was business as usual. The really exciting part? (for a nerd like me, anyway) I did this one totally on my own! No pattern! It's my alternative to the pillowcase dress, because those ribbons make me a little nervous.
Tied for exciting-ness is the fact that I had it finished in about an hour. Using the serger saves so much time! I heart my Baby Lock. :)

This is my favorite part - the big red buttons.

Friday, June 18, 2010
Big Girl Room

I got this in the mail today, and I'm feeling a bit wistful. We're about to start the process of having a big girl bed built for Neely, so I went ahead and ordered part of her bedding. Don't even bother trying to read that price sticker. I got it on eBay and didn't spend half what the quilt alone should've cost. ;)
Anyway, I can hardly believe that it's time to put away the crib for good. I will probably most definitely cry. Her birthday is still three months away, and I'm already having a hard time with the fact that my baby is going to be two years old. Where is all the time going???
Find the positive, Audra. Okay. Regrouping. The positive? I have a new project to work on. Neely's room - the big girl version.
Wednesday, June 16, 2010
Splashing Around
Last week, we played at the spray park with friends. I'm just now getting around to downloading my photos.


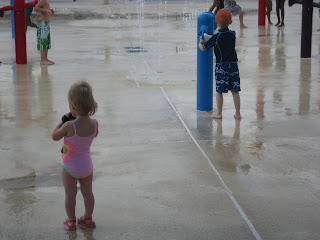

Neely wasn't too sure what to think.

Aidan jumped right in.

It is fun to spray your friends.

This is the closest Neely got to the action. When the sprayer directly underneath her feet started back up, she high-tailed it back to her spot on our bench. See the little boy in blue? With the orange hat? That's Camden. The only reason Neely ventured out this far is because she has a crush on Camden, and she followed him. :)
Monday, June 14, 2010
Drumroll, please...
The votes are in, and Nie Nie has met her match. I loved everyone's ideas, and anyone whose guess was Minnie Mouse was very, very close.

Voila! And the giveaway winner is...


Voila! And the giveaway winner is...

Comment number three, Andrea Christensen. Congratulations, Andrea! I've sent you an e-mail just in case you don't happen to read this today. Thanks everyone for participating!
Friday, June 11, 2010
Canning Extravaganza Final Installment: Preserving Berries
Here we are, the final day of the canning extravaganza. This last one is super simple. I wanted to save some of my blueberries, without using up all of my freezer space, for making cobblers, pies, crumbles, etc. I'm not going to go into as much detail today as I have previously, so if you need to see all the canning steps, click here or here.
All you need for this is jars, the canning equipment I've listed out in Part One and Part Two, fresh berries, water, sugar, and a saucepan.
First, make a sugar syrup to preserve the berries in. I used light syrup for mine (2 cups sugar + 1 quart water), but in hindsight, I probably should have used a medium syrup (3 cups sugar + 1 quart water), since my blueberries floated to the top of the jar. The heavier the syrup, the less likely it is that your fruit will float. To make the sugar syrup, simply combine the necessary amounts of water and sugar in a saucepan, heat, and stir until the sugar is completely dissolved.
Pack your jars with fruit. (Remember, the jars need to be sterilized and kept hot.) I filled mine to just under the rims. The berries cook and shrink a little during the canning process.

Now, using a funnel, add sugar syrup to the jars. Again, you can get them pretty full since the fruit shrinks in the hot water bath.

Add the lids and rings, then place jars in a hot water bath for 10 minutes. Voila! Preserved berries. I'll be glad to be able to use mine once we switch to the maintain mode of this dieting mess.

Again, if anybody's interested in a book to help you start canning, check out this one: Homemade Living: Canning & Preserving with Ashley English: All You Need to Know to Make Jams, Jellies, Pickles, Chutneys & More . Everything I learned about preserving berries came from this book.
Wednesday, June 9, 2010
Canning Extravaganza Part Two: Blueberry Syrup
After scouring the
internet for the best blueberry syrup recipe, I discovered something – they’re
all the same. Every single recipe I turned up was exactly the same. I’m sure
there are some variations out there, I just didn’t happen upon them. The one I
printed out to use came from here. I adapted the quantities, because I had so
many blueberries to use.

Recipe Ingredients:
4 c. fresh blueberries
1 c. water
2 c. orange juice (fresh
or from concentrate)
1 1/2 c. granulated sugar
6 tbsp. cornstarch
1 tsp. Almond extract
1/4 tsp. Ground cinnamon
Other things you need:
Jars – I used three
16-ounce jars. If you want smaller quantities, use six 8-ounce jars.
1 large stock pot
1 medium saucepan
small bowl
wooden spoon
ladle
dish towel and washcloth
jar lifter
rubber spatula
canning funnel
apron
1. Sterilize your jars.
For more in-detail on this, see my Blackberry Jam post.
2. In a small bowl, whisk
together cornstarch and 1/2 cup of the water. Stir until the cornstarch is
completely dissolved. Set aside.
3. In the saucepan over
medium heat, add blueberries, 1/2 cup water, orange juice, and sugar. Stir
gently, so you don’t squish the blueberries, and bring to a boil.

4. Slowly add the
cornstarch mixture to the boiling blueberry mixture. Stir constantly to avoid
clumping.
5. Reduce heat so the
syrup just simmers. Let it reduce until the blueberry syrup is thick enough to
coat the back of a spoon. This will take 3 to 5 minutes.

6. Turn off heat, and add
the almond extract and cinnamon.
7. If you want to enjoy
some on pancakes or crepes right away, by all means, do so! Come back to me
when you’re ready to save some for later. ;)
8. Set up your canning
area. I like to lay out a towel, to put the jars on when I get them out of that
hot water to fill them. I keep my lids and rings right by the towel. You’ll
also want your jar lifter or tongs nearby, along with your canning funnel,
spatula, and ladle.
9. Using tongs or jar
lifter, remove jars from the hot water bath and place on a towel.
10. Fill the jars with
blueberry syrup. A canning funnel makes this part of the job really simple.
Leave 1/2 inch headspace between the top of the syrup and where the underside
of the lid will be.
11. Using a clean, damp
cloth, wipe any stray jam from the rim of each jar and from the threads where
the ring will screw on.
12. Place lids on top of
jars, then screw rings onto the jars. They only need to be fingertip tight. You
can tighten them more later, when they’re not so hot.
13. Put the jars back into
the canner, making sure that there is about an inch of water covering the jars.
14. Boil for 10 minutes.
15. Remove jars using the
jar lifter and place back on towel to cool for at least 12 hours. You should
start hearing those lids pop after just a few minutes. If ten minutes goes by
and they haven’t all sucked down like they’re supposed to, put those jars back
in the hot water bath for a few minutes and try again.

16. Once the jars have
cooled, you should be able to keep them in a cool, dark place for up to a year.
That’s where part of my
five pounds of blueberries went! I’ve got one recipe left to share, and it’s
the simplest of all.
Tuesday, June 8, 2010
Meet Nie Nie - My First Giveaway!
Everyone, I would like you to meet Nie Nie. The Nie Nie Skirt by Pink Fig Patterns, that is. I purchased this pattern back in January. When I read through it for the first time, I was completely intimidated. I tucked her away for future use. Nearly six months later, the time came when I decided I could tackle Nie Nie, so several yards of polka-dot fabric later, here we are. She is six layers of ruffley cuteness. What do you think?


This leads me to the giveaway portion of my post. I've never done a giveaway, but I'm curious to see how many (or how few) of you are out there reading. What I want you to do is leave a comment telling me what you think will be on Nie Nie's matching t-shirt by midnight on Friday, June 11th.
You don't have to be correct to win, just put your best effort out there. I will give the winner a free embroidered or appliqued t-shirt (or onesie) of your choosing. It can be anything in my design gallery. You can see some of my designs in my Etsy shop, to which there is a link over on the right side of this page. I have many more photos in my facebook photo gallery, and if the winner isn't already my friend over there, I'll add you so you can make a well-informed choice.
Okay, go! Tell your friends! Leave your comment! I hope you love Nie Nie as much as I do.
Monday, June 7, 2010
Canning Extravaganza Part One: Blackberry Jam
I couldn’t even wait one
day. I just had to make something out of those delicious blackberries we picked
on Friday. I did a little online hunting, and I found a recipe for blackberry jam. I spent Friday evening making it.


Ingredients:
5 cups blackberries
7 cups sugar
1 package Sure-Jell (1 3/4
ounces in the package)
Everything else you need:
Jars (with the coordinating rings and lids, of course)– the recipe calls for seven 8-ounce jars. I used four 16-ounce jars.
Jars (with the coordinating rings and lids, of course)– the recipe calls for seven 8-ounce jars. I used four 16-ounce jars.
2 large stock pots (one
for cooking the jam, and one for your hot water bath)
1 small plate
a couple of small bowls
and medium mixing bowls
potato masher
wooden spoon
slotted spoon
dish towel and washcloth
jar lifter (tongs will
work, just be careful!)
rubber spatula or some
other non-metallic item, like a chopstick, that you can use to remove air bubbles from the jars
ladle or large spoon
canning funnel (not
absolutely necessary, but it prevents a lot of mess)
apron (again, not
required, but it’s a good idea if you don’t want to be wearing blackberry juice on your white t-shirt,
like me)
Okay...go!
- Sterilize your jars. Your dishwasher may have a cycle that can do this step for you. If not, first wash your jars, lids and rings in hot, soapy water. Dry the rings, and place the lids in a small bowl of super hot water. Drop the jars down into one of your stock pots, fill it with water, and set it on the stove to boil. Leave the jars in there until you’re ready to fill them up. Those babies need to stay hot.
- Put that small plate in the freezer. Don’t ask questions. Just stick it in there. J
- Measure the 7 cups of sugar into a medium-sized bowl.
- Using the potato masher, mash 5 cups of blackberries. Get some elbow grease in there. It takes a few minutes to get ‘em good and soupy.

- Set up your canning area. I like to lay out a towel, to put the jars on when I get them out of that hot water to fill them. I keep my lids and rings right by the towel. You’ll also want your jar lifter or tongs nearby, along with your canning funnel, spatula, and ladle.

- Set up your jamming area, too. I put all my ingredients (blackberries, Sure-Jell, sugar) within arm’s reach of my jam pot, because you’ll be stirring it constantly.
- Dump those soupy blackberries into a large pot. Turn the heat on high. Slowly add Sure-Jell, and stir constantly until the mixture boils.
- Add the sugar. Yes, all of it. Just dump it in there. And stir, by the way. Stir, stir, stir. Keep stirring until this mixture boils. Once it boils, turn it down to low.
- Using a slotted spoon, skim any foam off the top of the mixture.
- Get that plate out of the freezer. Scoop about
a teaspoon of the jam mixture onto the plate, and put it back in the
freezer. Set a timer for two minutes. At the end of two minutes, check to see if your jam has gelled
correctly. If it has, the surface of the jam will wrinkle when you push
your finger into it from the edge. If it doesn’t wrinkle, crank the pot
back up, boil the jam for five more minutes, then try the test again. (And
if you’re me, take this opportunity to lick the teaspoon and taste your
delicious jam!)
- Using tongs or jar lifter, remove jars from
the hot water bath and place on a towel.

- Fill the jars with jam. As I said before, a
canning funnel comes in really handy here. This was actually the first
time I’ve done any canning with one, and I loved it. Anyway, leave 1/4
inch headspace between the top of the jam and where the underside of the
lid will be.
- Using a clean, damp cloth, wipe any stray jam
from the rim of each jar and from the threads where the ring will screw
on.
- Place lids on top of jars, then screw rings
onto the jars. They only need to be fingertip tight. You can tighten them
more later, when they’re not so hot.
- Put the jars back into the canner, making sure
that there is about an inch of water covering the jars.

- Boil for 10 minutes.
- Remove jars and place back on towel to cool
for at least 12 hours. You should start hearing those lids pop after just
a few minutes. If ten minutes goes by and they haven’t all sucked down
like they’re supposed to, put those jars back in the hot water bath for a
few minutes and try again.

- Once they’ve cooled, you should be able to
keep unopened jam in a cool, dark place for up to a year. I’m afraid mine
will probably be eaten long before a year is up.
I hope that wasn’t too
confusing. It’s so easy! If I can make my own jam, so can you. The book I
referenced earlier, Canning & Preserving with Ashley English, is a great
resource for beginner canners. It doesn’t contain a whole lot of recipes, but
the information and canning tips are invaluable.
It’s also not hard to find
some of the canning tools I used, now that summer is here and it’s canning
season. I purchased this kit for about $7 at Wal-Mart on the same aisle as my
jars.

Making your own jam is
just one more way to know exactly where your food is coming from and what goes
into it. My blackberries went from the farm to the jar in less than 24 hours.
If anyone has any questions, I will do my best to answer them. If there are seasoned canners reading this and you see somewhere that I am totally leading people astray, please correct me!
Over the course of the week, I'll be posting two more recipes I used to put the five pounds of blueberries that we picked to work.
Sunday, June 6, 2010
Sneak Peek

Here's a sneak peek of what I've been working on this weekend, since we've been quarantined anyway. I'll be sharing in more detail starting tomorrow!
Friday, June 4, 2010
Blueberry Hill


Thursday, June 3, 2010
Summer is here.
Summer is finally here, so we're lingering on the couch a little longer each morning.

Picnicking outside with friends.

And learning to appreciate the friends we have right here at home.

Wednesday, June 2, 2010
Coming Clean
It’s time to come clean. That isn’t exactly the best way to start a blog post, is it? I do, however, feel like I should admit what has been consuming my time and thoughts for the last couple of weeks. I’ve been terrified to talk about, because if I put it out there, you’ll hold me accountable to it.
Here goes…
I’ve started a new diet. I really don’t like that term, though. Diet. It just sounds negative and oppressive, not to mention that dull ache of hunger it induces in my stomach.
Let’s try again. I’m trying to change my overall attitude about food consumption and make healthier choices. Yikes, that doesn’t really sound great either. Too bad. I’m sticking with it.
Three weeks ago, while visiting family, I stepped on a scale for the first time in nearly a year. That’s right, a year. Aidan broke ours, and we just never got around to replacing it. The number that stared back at me horrified me. It was only a few pounds shy of what I weighed the day Neely was born, you know, when I was nine months pregnant. The fact that all of last summer’s clothes were fitting a little snug should have been a clue.
Needless to say, it was time for a change. Upon returning home, I purchased a new scale and got to work. I plugged my height, weight, and goals into a handy dandy application for my phone and started calorie counting and focusing on eating more produce, whole grains, and less processed food. I’ve also quit drinking sodas altogether. And I started jogging. (Oh, my aching legs!)
It’s working. I noticed after only a few days that I felt different, less bloated. I think a lot of my poor eating choices were causing me to retain water. My goal has been to lose two pounds a week, and for the last two weeks, I have succeeded.
The next step I’d like to take is to join a gym and get some advice on how to tone things up. We have a lot of things planned this week, so that may not happen until next week, but it’s definitely on the to-do list.
So now that I’ve shared with you, I have to keep it up, right? ;)
Here are a few websites I’ve been using to find recipes and inspiration…
Subscribe to:
Posts (Atom)


